Kubernetes Workloads
쿠버네티스는 가장 기본적인 구성단위가 되는 오브젝트와, 이 기본 오브젝트를 생성하고 관리하는 추가적인 기능을 가진 컨트롤러(Controller)로 이루어진다. 컨트롤러는 다양한 형태의 워크로드를 지원하고, 다양한 시나리오에 맞게 Pod를 운영할 수 있도록 지원한다.
기본 오브젝트
쿠버네티스에 의해서 배포 및 관리되는 가장 기본적인 오브젝트는 컨테이너화되어 배포되는 애플리케이션의 워크로드를 기술하는 오브젝트로 Pod, Service, Volume, Namespace 4가지가 있다.
# Pod
- Pod는 쿠버네티스에서 가장 기본적은 배포 단위로, 하나 이상의 컨테이너를 포함하는 단위이다. Pod 안의 컨테이너들은 IP와 Port를 공유하고, 디스크 볼륨을 공유하는 특징을 갖는다.
- 실행중인 포드의 환경설정, service account, resource limit을 수정할 수 없다.
- Pod는 재시작하면 기록이 모두 지워지기 때문에 --restart=Never 로 실행한다.
참고) 애플리케이션 배포시에 항상 함께 사용하는 프로그램을 같이 배포할 수 있는데 이런 경우에 Pod가 유용하게 활용될 수 있다.
apiVersion: v1
kind: Pod
metadata:
  name: myapp-pod
  labels:
    app: myapp
    type: front-end
spec:
  containers:
    - name: nginx-container
      image: nginx
      ports:
        - containerPort: 8080
# 포드 생성
kubectl run nginx --image=nginx --labels=tier=db --port=8080 (container port)
kubectl run httpd --image=httpd:alpine --port 80 --expose --dry-run-client -o yaml (cluster ip)
# 포드 이미지
kubectl describe pod pod_name | grep -i image
# 포드의 노드 이름
kubectl get pods -o wide --show-labels
kubectl get pods --selector app=App1
kubectl get pods -l env=dev,bu=finance,tier=frontend --no-headers | wc -l
kubectl get all
# 특정 포드 조회
kubectl get pods webapp
# 포드 삭제
kubectl delete pod webapp
# 포드 YAML 및 실행
kubectl run redis --image=redis --dry-run=client -o yaml > pod.yaml
kubectl run mosquito --image nginx --restart=Never
kubectl apply -f pod.yaml
# 포드 Config 수정
kubectl edit pod redis
kubectl explain pod --recursive | less
# Service & Service Type
- 지정된 IP로 생성 가능(Pod의 경우에 지정되는 IP가 랜덤하게 지정이 되고, 리스타트 때마다 변함)
- 여러 Pod에 같은 애플리케이션을 운용할 경우 이 Pod 간의 LB를 지원
- 고유한 DNS 이름을 가질 수 있음
ClusterIP
Exposes the Service on a cluster-internal IP. Choosing this value makes the Service only reachable from within the cluster. This is the default ServiceType.
apiVersion: v1
kind: Service
metadata:
  name: back-end
spec:
  type: ClusterIP
  ports:
    - protocol: TCP
    - targetPort: 80 #default(same as port)
      port: 80
  selector: #labels
    app: myapp
    type: back-end
# Create a Service named redis-service of type ClusterIP to expose pod redis on port 6379
kubectl expose pod redis --name redis-service --port=6379 --target-port 6379
kubectl expose pod redis --port=6379 --name redis-service --dry-run=client -o yaml
kubectl create service clusterip redis --tcp=6379:6379 --dry-run=client -o yamlLoadBalancer
Exposes the Service externally using a cloud provider's load balancer. NodePort and ClusterIP Services, to which the external load balancer routes, are automatically created.
apiVersion: v1
kind: Service
metadata:
  name: back-end
spec:
  type: LoadBalancer
  ports:
    - targetPort: 80 #default(same as port)
      port: 80
      nodePort: 30008 #range(30000 ~ 32767)
  selector: #labels
    app: myapp
    type: back-end
참고) AWS EKS lb
apiVersion: v1
kind: Service
metadata:
  name: web-service
  annotations:
    service.beta.kubernetes.io/aws-load-balancer-backend-protocol: http
    service.beta.kubernetes.io/aws-load-balancer-ssl-cert: xxx
    service.beta.kubernetes.io/aws-load-balancer-ssl-ports: "https"
  namespace: default
spec:
  ports:
  - name: http
    port: 80
    targetPort: 80
  - name: https
    port: 443
    targetPort: 80
  selector:
    run: web-app
  type: LoadBalancer
NodePort
Exposes the Service on each Node's IP at a static port (the NodePort). A ClusterIP Service, to which the NodePort Service routes, is automatically created. You'll be able to contact the NodePort Service, from outside the cluster, by requesting :<NodeIP>:<NodePort>
apiVersion: v1
kind: Service
metadata:
  name: hello-node-svc
spec:
  selector:
    app: hello-node
  type: NodePort
  ports:
    - name: http
      port: 80
      protocol: TCP
      targetPort: 8080
      nodePort: 30036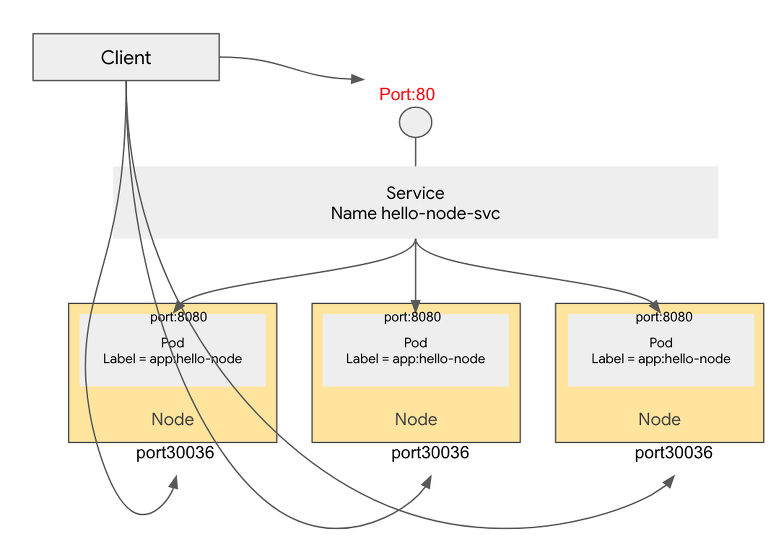
# service 생성
kubectl expose deploy simple-webapp-deployment --name=webapp-service --target-port=8080 --type=NodePort --port=8080 --dry-run=client -o yaml > test.yaml

# Create a Service named nginx of type NodePort to expose pod nginx port 80 on port 30080 on the nodes
kubectl expose pod nginx --port=80 --name nginx-service --type=NodePort --dry-run=client -o yaml (recommended)
kubectl create service nodeport nginx --tcp=80:80 --node-port=30080 --dry-run=client -o yaml
# Namespace
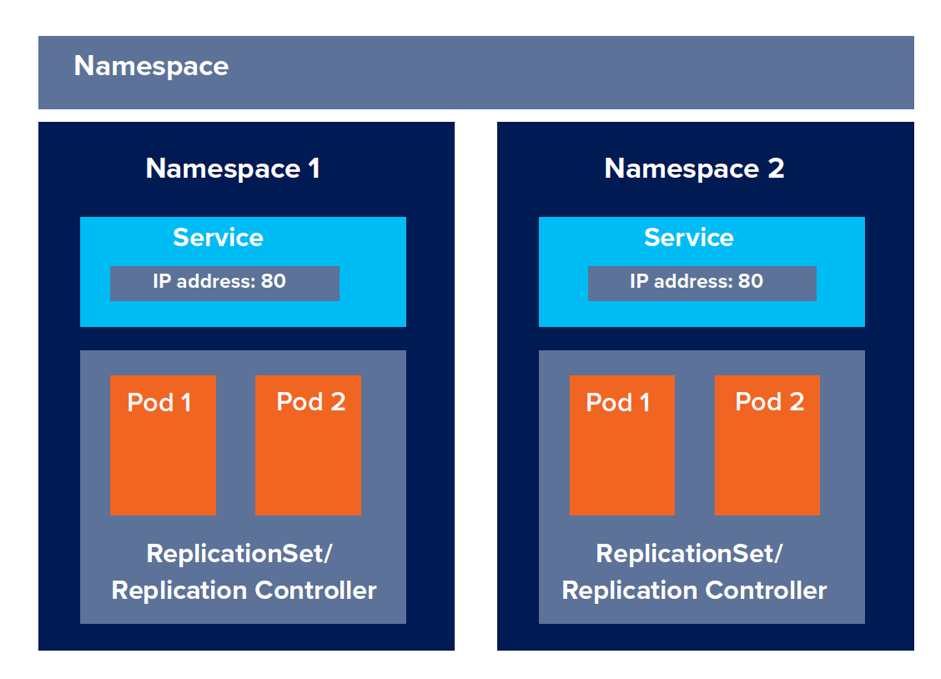
네임스페이스는 쿠버네티스 클러스터내의 논리적인 분리단위라고 할 수 있다.
- 네임스페이스별로 리소스를 나눠서 관리할 수 있다.(Pod, Service)
- 사용자별로 네임스페이스별 접근 권한을 다르게 운영할 수 있다.
- 네임스페이스별로 리소스의 할당량을 지정할 수 있다.
네임스페이스는 논리적인 분리이기 때문에 분리 정책을 적용하지 않는 이상 네임스페이스간의 통신이 가능하다.
apiVersion: v1
kind: Namespace
metadata:
  name: dev
# namespace 생성
kubectl create namespace dev
# default namespace 변경
kubectl config set-context $(kubectl config current-context) --namespace=dev
# namespace 카운트
k get ns --no-headers | wc -l
# namespace 포드 생성
k run redis -n xxx --image=redis --dry-run=client -o yaml > test.yaml
# pod namespace 조회
k get pods --all-namespaces | grep blue
# fqdn(fully qualified domain name)
serviceName.ns.svc.cluster.local
컨트롤러
# Replicaset(Previous name : Replication Controller)
- High Availability
- Load Balancing & Scaling
- Self-healing
Kubernetes supports self-healing applications through ReplicaSets and Replication Controllers. The replication controller helps in ensuring that a POD is re-created automatically when the application within the POD crashes. It helps in ensuring enough replicas of the application are running at all times.
Kubernetes provides additional support to check the health of applications running within PODs and take necessary actions through Liveness and Readiness Probes.
apiVersion: v1
kind: ReplicationController
metadata:
  name: myapp-rc
  labels:
    app: myapp
    type: front-end
  annotations:
    buildversion: 1.34
spec: Pod 영역
apiVersion: apps/v1
kind: ReplicaSet
metadata:
name: simple-webapp
labels:
app: myapp1
type: front-end
spec:
replicas: 3
selector:
matchLabels: #important!
app: myapp
template:
metadata:
labels:
app: myapp #important!
type: front-end
spec:
containers:
- name: simple-webapp
image: simple-webapp# replicaset의 개수
kubectl get replicasets.apps
# replicaset 이미지
kubectl describe replicasets.apps new-replica-set
# replicaset 삭제
kubectl delete replicasets.apps replicaset-1
# replicaset 수정
kubectl edit replicasets.apps replicaset-1
# replicaset replica 수정
kubectl scale replicaset --replicas=5 new-replica-set
# Deployment Controller
Deployment is an object which can own ReplicaSets and update them and their Pods via declarative, server-side rolling updates. While ReplicaSets can be used independently, today they're mainly used by Deployments as a mechanism to orchestrate Pod creation, deletion and updates. When you use Deployments you don't have to worry about managing the ReplicaSets that they create. Deployments own and manage their ReplicaSets. As such, it is recommended to use Deployments when you want ReplicaSets.
With Deployments you can easily edit any field/property of the POD template.
# deploy의 개수
kubectl get deployments.apps

# deploy 이미지
kubectl describe deployments.apps new-deploy | grep -i image

kubectl create deployment httpd-frontend --image=xxxx

kubectl scale deploy httpd-frontend --replicas=3

kubectl get deployments.apps httpd-frontend

kubectl create deploy --image=nginx nginx --dry-run=client -o yaml > test.ayml

kubectl create deploy --image=nginx nginx --replicas=4
참고) rolling updates
롤링 업데이트 방식은 Pod를 하나씩 업그레이드 해가는 방식이다.

롤링 업데이트 실패시 수동으로 롤백해주어야한다.
# you can rollback to a specific revision by specifying it with --to-revision
kubectl rollout undo deployment.v1.apps/nginx-deployment --to-revision=2
고급 컨트롤러
# DaemonSets

Pod가 각각의 노드에서 하나씩만 돌게 하는 형태로 Pod를 관리하는 컨트롤러. 모니터링 용도(예를들면 fluentd로 많이 사용된다.)로 많이 쓰임.
- kube-proxy
- network
DaemonSets은 특정 노드에만 Pod를 배포할 수 있도록, node selector를 이용해서 특정 노드만을 선택할 수 있게 지원한다.
apiVersion: apps/v1
kind: DaemonSet
metadata:
	name: monitoring-daemon
spec:
	selector:
    	matchLabels:
        	app: monitoring-agent
    template:
    	metadata:
        	labels:
            	app: monitoring-agent
        spec:
        	containers:
            - name: monitoring-agent
              image: monitoring-agent
kubectl get ds --all-namespaces
kubectl -n kube-system describe ds weave-net | grep -i image
# DaemonSet 생성시 deploy로 생성하고, 필요없는 부분 삭제
# Deploy -> DaemonSet 변경 / replicas, strategy 제거
kubectl create deploy elasticsearch --image=xxx --dry-run -o yaml > elastic.yaml
# StatefulSet
데이터베이스와 같이 상태를 가지는 애플리케이션을 관리하기 위한 컨트롤러.
기존 컨트롤러는 아래와 같은 문제점이 있음.
- Pod의 이름이 불규칙적이다.
마스터/슬레이브 구조를 가지는 데이터베이스 등에서 마스터 서버의 이름을 특정 이름으로 지정할 수가 없다.
- Stateless Pod들은 기동이 될때 병렬로 동시에 기동된다.
데이터베이스의 경우에는 마스터 노드가 기동된 다음 스레이브 노드가 순차적으로 기동되어야하는 순차성을 가지고 있는 경우가 있음.
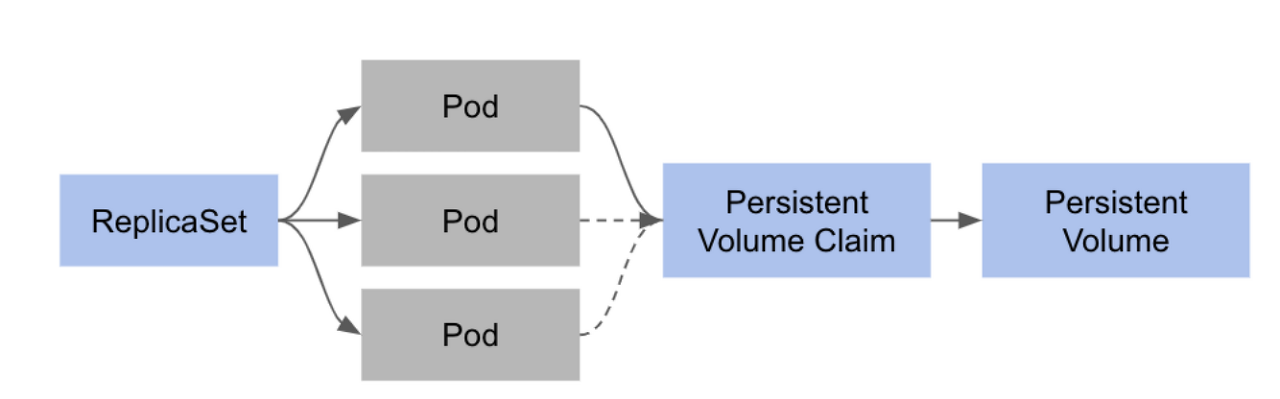
- 볼륨 마운트
맨 처음 생성된 Pod가 PVC와 PV에 연결이 되기 때문에 뒤에 생성되는 Pod들은 PVC를 얻지 못해서 디스크를 사용할 수 없음.
Statefulset은 앞서 설명한 stateless 애플리케이션이 관리하는 컨트롤러로 할 수 없는 기능을 제공한다. 대표적인 기능들은 아래와 같다.
- Pod 이름에 대한 규칙성을 부여
생성된 Pod들은 {Pod name}-{num} 식으로 이름이 정해진다. 예를들면 cassandra-0, cassandra-1 … 가 된다.
- 배포시 순차적인 기동과 업데이트
동시에 모든 Pod를 생성하지 않고, 0, 1, 2 … 순서대로 하나씩 Pod를 생성한다. 이러한 순차기동은 데이터베이스에서 마스터 노드가 기동된 후에, 슬레이브 노드가 기동되어야 하는 조건등에 유용하게 사용될 수 있다.
- 개별 Pod에 대한 디스크 볼륨 관리
Pod 마다 각각 PVC와 PV를 생성하여 관리할 수 있도록한다.
apiVersion: apps/v1
kind: StatefulSet
metadata:
  name: cassandra
  labels:
    app: cassandra
spec:
  serviceName: cassandra
  replicas: 3
  selector:
    matchLabels:
      app: cassandra
  template:
    metadata:
      labels:
        app: cassandra
    spec:
      terminationGracePeriodSeconds: 1800
      containers:
      - name: cassandra
        image: gcr.io/google-samples/cassandra:v13
        imagePullPolicy: Always
        ports:
        - containerPort: 7000
          name: intra-node
        - containerPort: 7001
          name: tls-intra-node
        - containerPort: 7199
          name: jmx
        - containerPort: 9042
          name: cql
        resources:
          limits:
            cpu: "500m"
            memory: 1Gi
          requests:
            cpu: "500m"
            memory: 1Gi
        securityContext:
          capabilities:
            add:
              - IPC_LOCK
        lifecycle:
          preStop:
            exec:
              command:
              - /bin/sh
              - -c
              - nodetool drain
        env:
          - name: MAX_HEAP_SIZE
            value: 512M
          - name: HEAP_NEWSIZE
            value: 100M
          - name: CASSANDRA_SEEDS
            value: "cassandra-0.cassandra.default.svc.cluster.local"
          - name: CASSANDRA_CLUSTER_NAME
            value: "K8Demo"
          - name: CASSANDRA_DC
            value: "DC1-K8Demo"
          - name: CASSANDRA_RACK
            value: "Rack1-K8Demo"
          - name: POD_IP
            valueFrom:
              fieldRef:
                fieldPath: status.podIP
        readinessProbe:
          exec:
            command:
            - /bin/bash
            - -c
            - /ready-probe.sh
          initialDelaySeconds: 15
          timeoutSeconds: 5
        # These volume mounts are persistent. They are like inline claims,
        # but not exactly because the names need to match exactly one of
        # the stateful pod volumes.
        volumeMounts:
        - name: cassandra-data
          mountPath: /cassandra_data
  # These are converted to volume claims by the controller
  # and mounted at the paths mentioned above.
  # do not use these in production until ssd GCEPersistentDisk or other ssd pd
  volumeClaimTemplates:
  - metadata:
      name: cassandra-data
    spec:
      accessModes: [ "ReadWriteOnce" ]
      storageClassName: fast
      resources:
        requests:
          storage: 1Gi
---
kind: StorageClass
apiVersion: storage.k8s.io/v1
metadata:
  name: fast
provisioner: k8s.io/minikube-hostpath
parameters:
  type: pd-ssd
이때, PVC의 이름은 {StatefulSet}-{Pod name}으로 생성된다.
Static Pods
- kube-apiserver와 kube-sceduler 등 클러스터에서 지원하는 기능(control plane) 없이 Pod를 관리하고 싶은 경우
- 노드명이 suffix로 붙음(kubectl get pods --all-namespaces | grep "\-master")
- manifests 폴더에 있는 yaml 파일들이 static pod 정의(해당 위치에있는 yaml 파일들은 자동으로 만들어짐)
| Static pods | DaemonSets |
| Created by the Kubelet | Created by Kube-API server(DaemonSet Controller) |
| Deploy Control plane components as static pods | deploy monitoring agents, logging agents on nodes |
| lgnored by the kube-scheduler | |
- how to kill delete static pod
root@controlplane:~# kubectl get pods --all-namespaces -o wide  | grep static-greenbox
default       static-greenbox-node01                 1/1     Running   0          19s     10.244.1.2   node01       <none>           <none>
root@controlplane:~#

root@controlplane:~# ssh node01(172.17.0.41)

root@node01:~# ps -ef |  grep /usr/bin/kubelet   (ps -ef | grep kubelet | grep "\--config")
root       752   654  0 00:30 pts/0    00:00:00 grep --color=auto /usr/bin/kubelet
root     28567     1  0 00:22 ?        00:00:11 /usr/bin/kubelet --bootstrap-kubeconfig=/etc/kubernetes/bootstrap-kubelet.conf --kubeconfig=/etc/kubernetes/kubelet.conf --config=/var/lib/kubelet/config.yaml --network-plugin=cni --pod-infra-container-image=k8s.gcr.io/pause:3.2
root@node01:~# grep -i staticpod /var/lib/kubelet/config.yaml
staticPodPath: /etc/just-to-mess-with-you
root@node01:~#

root@node01:/etc/just-to-mess-with-you# ls
greenbox.yaml
root@node01:/etc/just-to-mess-with-you# rm -rf greenbox.yaml
root@node01:/etc/just-to-mess-with-you#

# Exit out of node01
root@controlplane:~# kubectl get pods --all-namespaces -o wide  | grep static-greenbox
root@controlplane:~#
참고) static pod 실행시 --restart=Never를 잊지말자.
다음 포스팅에서는 쿠버네티스 스케줄러에 대해서 살펴보도록 하겠습니다.
출처
- https://kubernetes.io/docs/tutorials/stateful-application/cassandra/
- https://bcho.tistory.com/1306
- https://bcho.tistory.com/1262?category=731548
- https://www.weave.works/blog/optimizing-cluster-resources-for-kubernetes-team-development
- https://kubernetes.io/docs/concepts/overview/working-with-objects/kubernetes-objects/
- https://bcho.tistory.com/1257?category=731548
- https://v1-18.docs.kubernetes.io/docs/concepts/overview/components/
- https://kubernetes.io/docs/reference/command-line-tools-reference/kube-controller-manager/